
Use the overlay feature in XOGO to place logos, stock tickers and more on top of your other content.
3 Ways to Use Overlays
We recently introduced a new feature called overlays. This feature allows you to place one layer of content on top of another in your XOGO playlists, similar to what you might do in a layer-based image editor like Photoshop. Here are the three most common use cases for overlays, and information on how to set them up.

Display your company logo in the corner of any playlist with our overlay feature.
1) Logo Overlay
Quite often businesses want to display their logo in one corner of their screens, on top of the content that is already playing. Our overlay feature makes this easy. Simply create a transparent PNG file with your logo in the corner, and then load it into XOGO Manager as an overlay. Then you can apply it to one or more of your players.
How it Works
For a logo overlay the first thing to determine is the resolution of your display(s). Are you playing your content on a 1080HD television (the most common) or maybe a shiny new 4K model? Is it mounted in landscape or portrait orientation? Your overlay will need to be designed in a resolution to match. For example, if your TV is 1080HD then your overlay should be designed in 1920x1080 pixels (landscape) or 1080x1920 pixels (portrait). If you're using a standard graphic design tool like Sketch, Pixelmator or Photoshop, this would be the size of your "canvas" or "artboard".
The next thing to decide is which corner you'd like your logo to appear in, and how you'd like the logo to look. Typically you would drop a white version of your logo onto the canvas, then adjust its opacity to about 50%. This will make the logo visible without distracting too much from the graphics or video content playing behind it.
When you are satisfied with how your overlay looks, export it to your desktop as a transparent PNG. The file type is important, as PNG is the only type that supports transparency. If you've done this correctly, your file will be completely transparent except for the logo that appears in one corner (check out this video tutorial to see the entire process).
Once you've created your logo overlay, open the sidebar menu in XOGO Manager and click on Overlays. Upload your graphic and give it a name (i.e. "1080 Logo Overlay"), enter its resolution (i.e. 1920 x 1080) and then click save. Now under Players in XOGO Manager, when you click on any of your players you can choose to assign it not only a playlist, but also your new logo overlay, which will appear on top of that playlist. Click save and your player will automatically download and display the new overlay on top of the playlist content.
Because the overlay is transparent except for the logo, you’ll be able to see all of the normal playlist content, but with the logo over top of it in one corner.
Remember that you can upload multiple overlays in various resolutions to your XOGO account, so even if you have a mix of 720HD/1080HD/4K screens deployed, you could have the same type of overlay (in the appropriate resolution) playing on every one of them.
Use the overlay feature to display any graphic 24/7 with no image transitions.
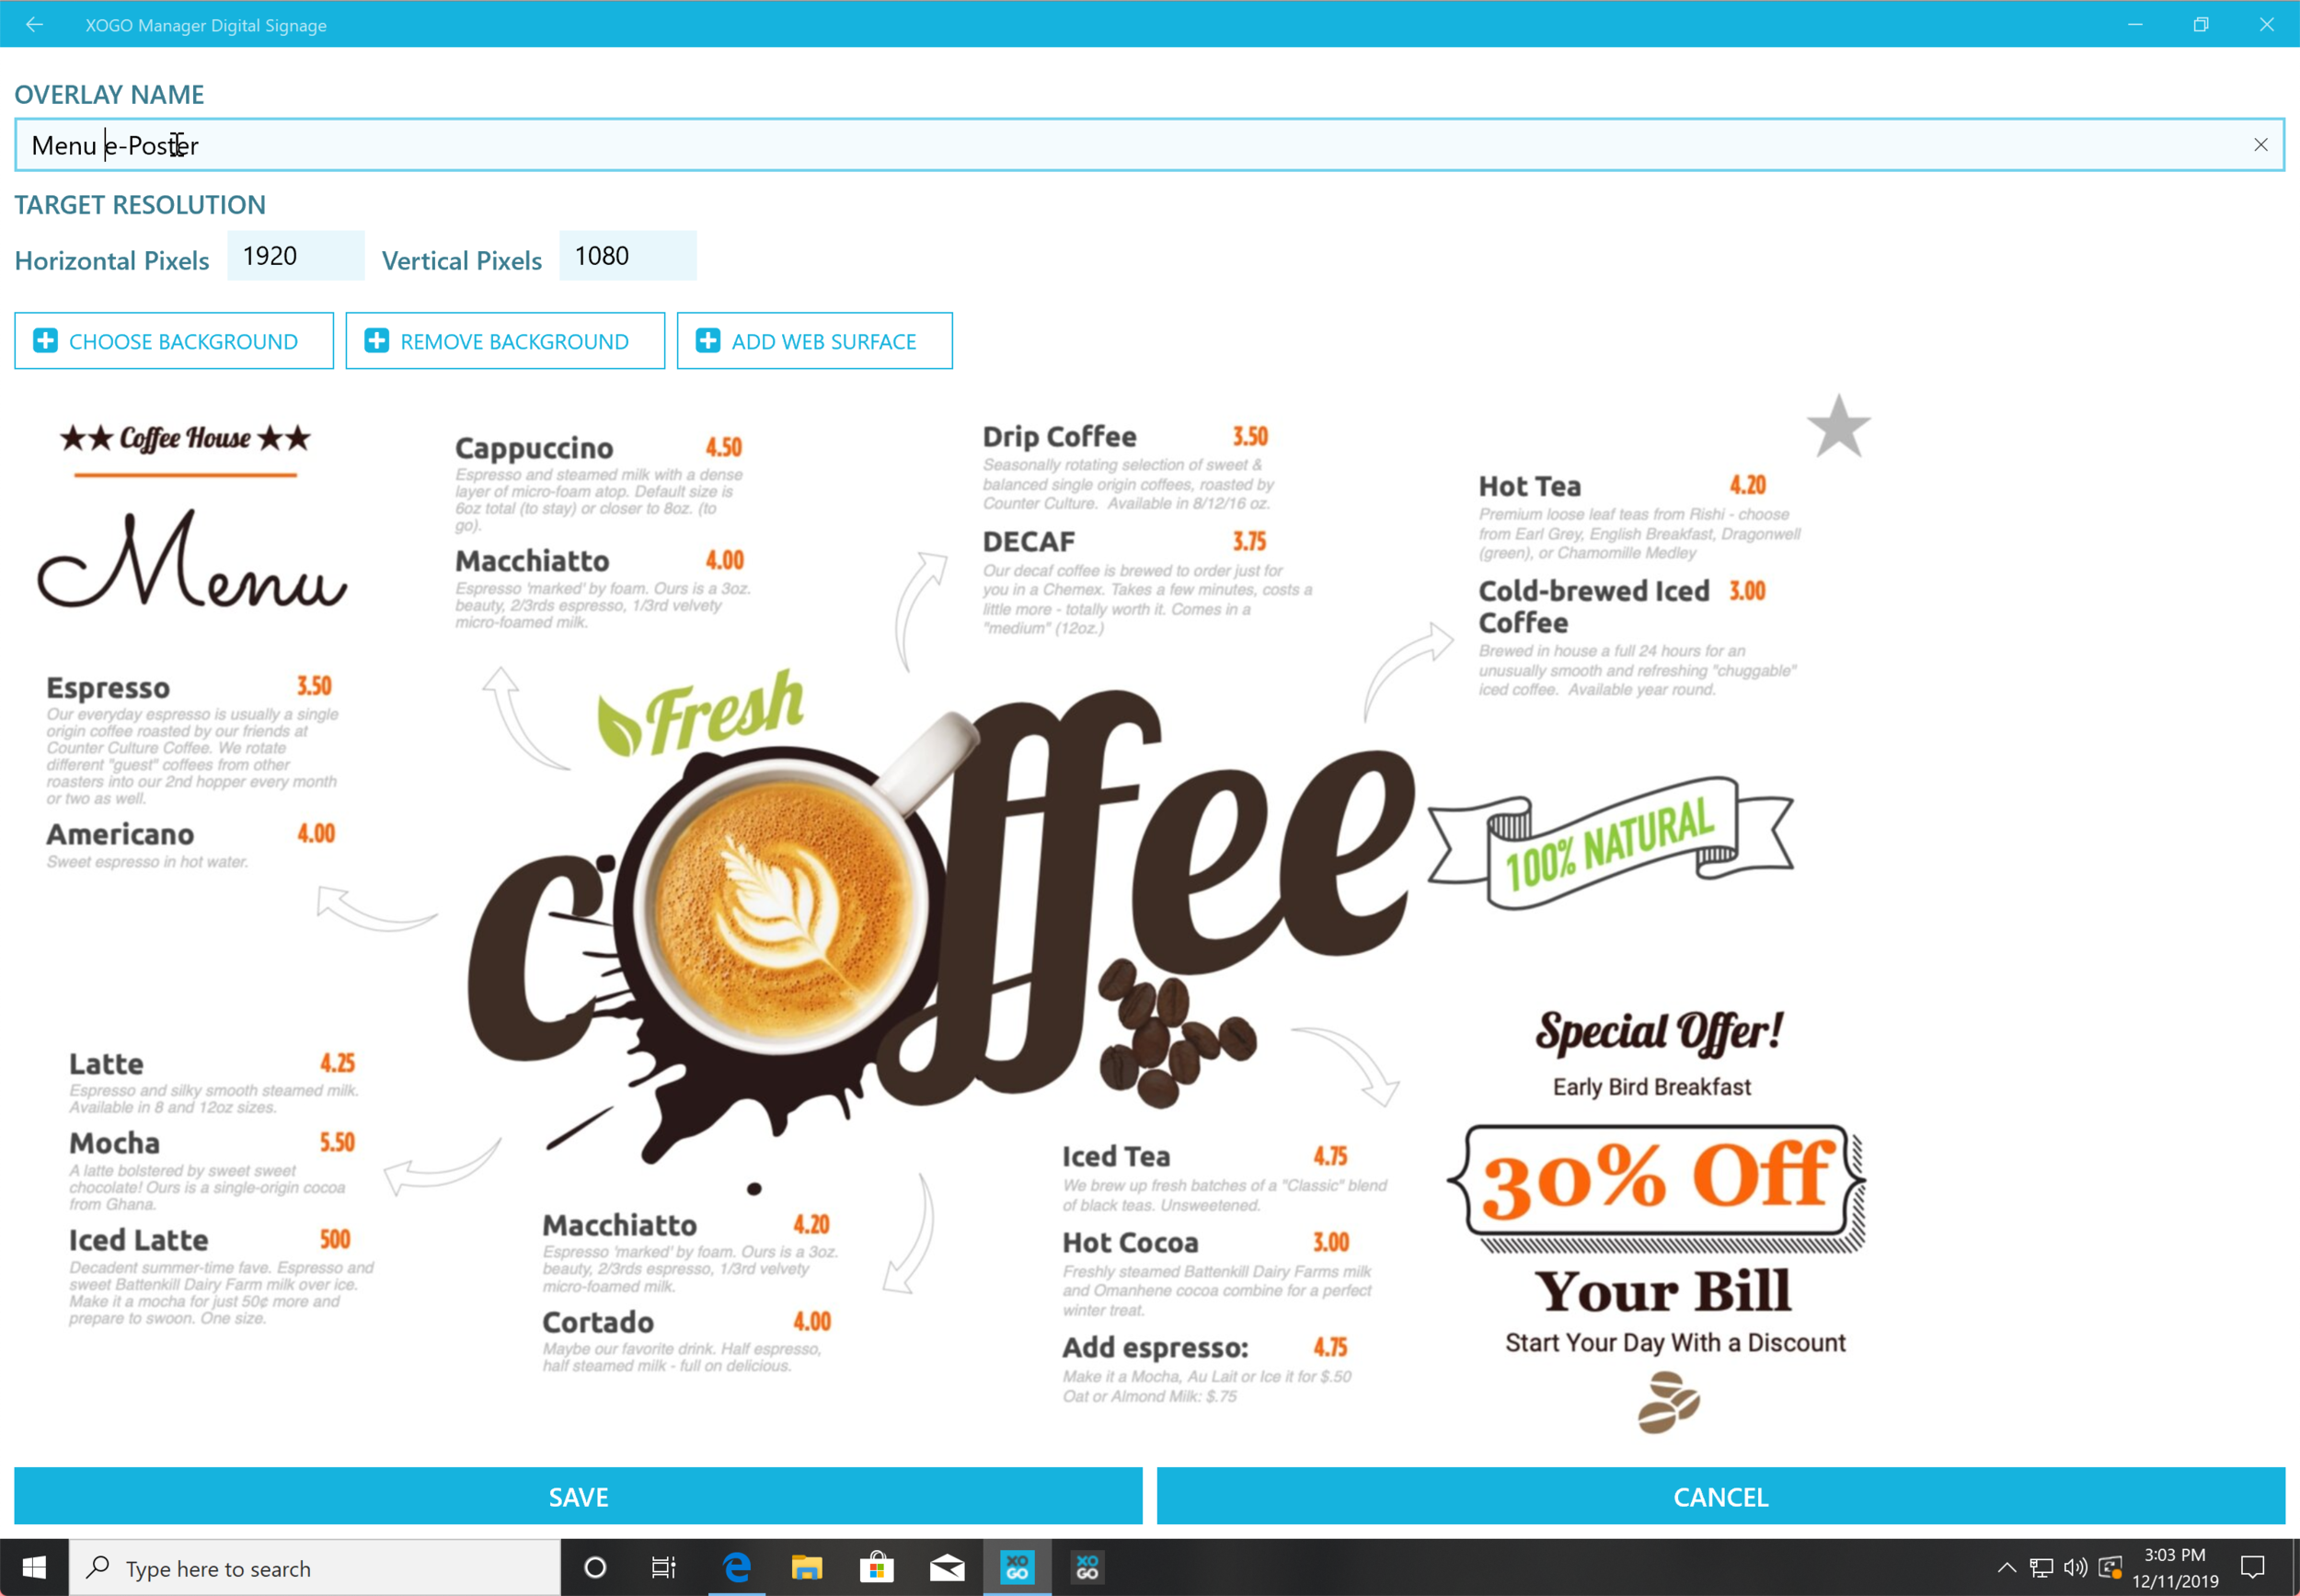
2) Static / e-Poster Overlay
XOGO allows you to schedule your playlist content according to the time-of-day, day-of-week, and even choose how long you want each individual graphic to be on-screen. But what if you simply want to display ONE single graphic 24/7? It might be a restaurant menu board that needs to be displayed all day long, or simply an advertising graphic that runs all day and only gets changed once in a great while. Our overlay feature is perfect for this as well.
By default, if you only load one item into your playlist, it will play 24/7. However, there will be a very brief image transition every X number of seconds or minutes (whatever duration you have the graphic set to) as the image reloads and begins to play again. If you want the graphic to play full-time 24/7 with zero interruptions, just set it to play as an overlay.
How it Works
As with logo overlays, the first thing to determine is the resolution of your screen(s). Make sure that your graphic is the same resolution as the screen that you want to play it on, and remember that you can upload multiple versions in various resolutions (i.e. 720HD, 1080HD, 4K) to play on various screens. The graphic doesn’t need to be transparent like in the previous example, because we don’t need any other content to appear behind the overlay.
Once your graphic is prepared, simply export it to your desktop as a PNG or JPEG file. Then open the sidebar menu in XOGO Manager and click on Overlays. Upload your graphic and give it a name (i.e. 1080 Lunch Menu). Now under Players, when you click on any given player you can choose to assign it this overlay (and NO playlist) in order to have the overlay play 24/7 on-screen with no image transitions. There's no easier way to create a static menu board or e-poster!

Display dynamic web content like news and stock quotes on top of your overlays.
3) Overlays with Web Surfaces
This one is a bit more complicated, but very powerful. In addition to standard overlays like we have discussed above, you can add a "web surface" that appears on top of your overlay. In essence this is online content that appears on top of your overlay, which in turn appears on top of your standard playlist content. We have some very creative customers like Genesee & Wyoming Inc. that use web surfaces to display the current temperature, time/date, news and stock information on top of an overlay with a transparent center section, while the rest of their graphic/video content plays in the background. In the image above, the center section that appears black is actually transparent, so graphics and videos remain visible behind the information bars on the top and bottom of the screen.
How it Works
In order to set up web surfaces, first upload your overlay in the appropriate resolution for your screen(s). Then click the "Add Web Surface" button and you'll see an "attributes" box appear. This is where you enter the URL for your web content (there are many free sources available online), and adjust its size and position in pixels. You may need to experiment a bit in order to get the content to appear exactly where you want it.
Repeat as needed until you have all of the web surfaces appearing as you want, then click save. Now when it's assigned to a player, your overlay will have X number of web surfaces displaying on top of it, while your playlist content plays in the background behind the overlay layer.
Need Help Getting Set Up?
We always endeavor to keep XOGO as simple as possible, while also adding powerful features for our users. If you're having trouble setting up your overlays please feel free to initiate a support ticket or contact our XOGO Studio team, who can design your overlay content and load it right into your XOGO account for you.
